Smartphone photography has come a long way, but that doesn't mean your phone doesn't sometimes need a helping hand to reach its full potential. The best photo editing apps can help take your snaps to the next level – and one of our favorites is the Lightroom app.
The native camera apps on iPhone and Android are fantastic, offering a plethora of automated and advanced controls, but they often lack some of the more expert features you’d get with mirrorless cameras and DSLRs. Not to mention the ability to perform advanced edits to raw files.
The Adobe Lightroom app (or 'Adobe Lightroom – Photo Editor and Pro Camera', to give it its full Android name) fills that gap with a powerful shooting and editing solution for both Android and iOS smartphones. The Lightroom app's built-in camera and editing solutions provide a complete package for shooting, editing and sharing your smartphone snaps. And best of all, it’s as easy to use as it is powerful.
In this guide, we’re going to take you through basic shooting with the Lightroom app's 'Professional camera' for full control. Then we'll show you how to professionally edit your smartphone shots manually – to achieve results like the shot above – using the Lightroom app’s built-in tools and presets.
Lightroom's Android and iOS apps might not be quite as powerful as their desktop equivalent, but they have more than enough power to take your smartphone photos from point-and-shoot level to professional quality for social media. But first, let's cover the basics of the Lightroom's smartphone app...
- Photoshop vs Lightroom: what's the difference and which is the best for you?
The basics: Is the Lightroom app free?
Yes, but with a few caveats. You can download the Lightroom app for free from the Apple App Store or Google Play Store, and this gives you most of its editing tools, plus the ability to shoot, organize and share photos from within the app.
But a few key tools, including the ability to edit raw files, require a Creative Cloud subscription. The best one for Lightroom is the Creative Cloud Photography Plan ($9.99 / £9.98 / AU$14.29 per month), which includes both Lightroom and Photoshop.
If you have that subscription, you can log into the app to unlock the extra features. These include localized adjustment tools, healing tools, perspective corrections, and cloud syncing to the desktop versions of Lightroom.
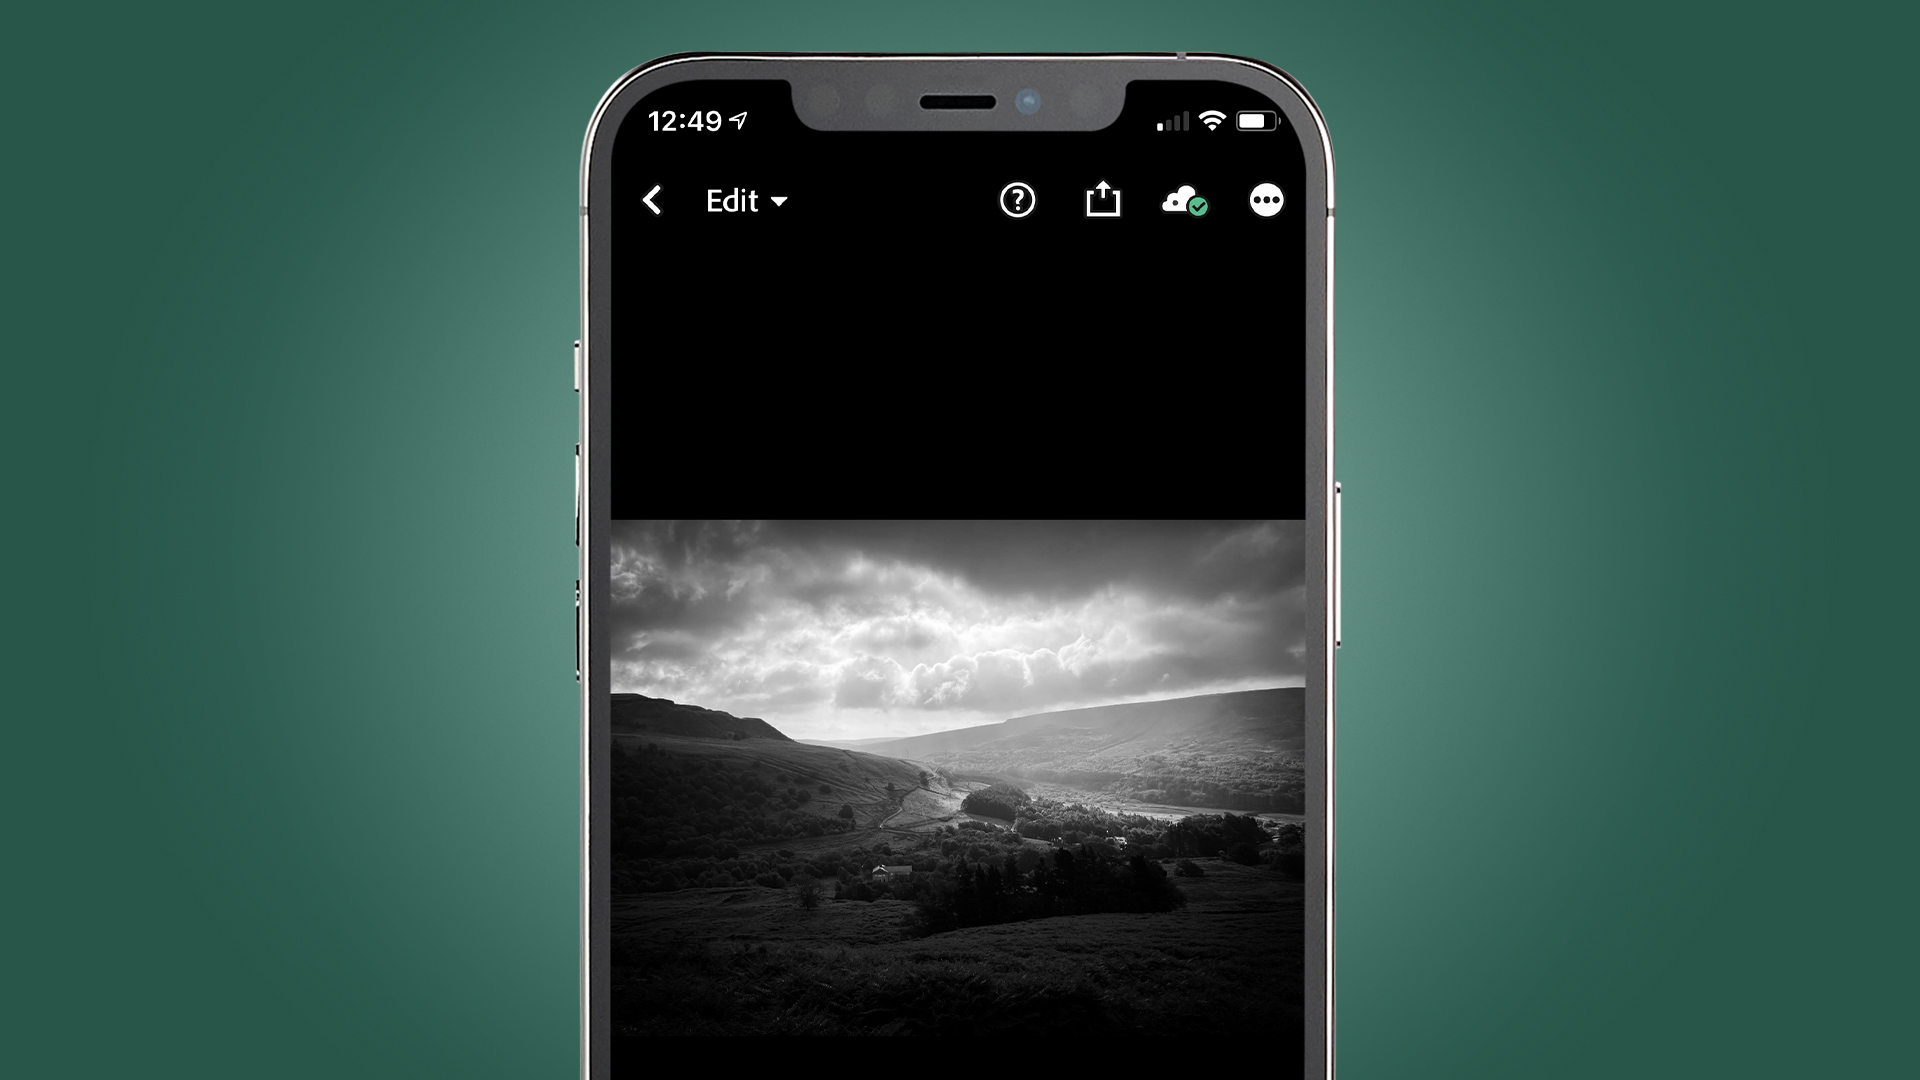
So what exactly is the Lightroom app? Formally known as Lightroom Mobile, it's essentially a smartphone and tablet version of Lightroom CC that incorporates a camera into the app, alongside the ability to edit your images and share them.
This one-stop solution features a basic 'Automatic' camera, where you can simply point-and-shoot with control over exposure compensation. But you also get a 'Professional' camera, which we'll be covering in this guide, where you can take manual control over all camera settings except aperture.
This includes everything from capturing to editing and sharing on social media. You can also share photos to the 'Discover' section of the app, which is effectively Adobe’s equivalent of Instagram with the added benefit of seeing the processing that others have applied to their images.
How to take photos in the Lightroom app
The Lightroom app's built-in camera is pretty basic, regardless of whether shooting in the 'Automatic' or 'Professional' modes. But what it does provide is all the control you need to take almost any kind of photo. Using the built-in camera provides a seamless experience within the Lightroom app and you can shoot, edit and share images in a matter of minutes.
As well as the 'Automatic' and 'Professional' camera options, the camera also includes the ability to shoot HDR (High Dynamic Range) images. This sees the resulting images merged into a single Raw file for editing, which is fantastic for capturing detail in high-contrast scenes such as landscapes. This feature is amazing, but some Android users may find that the feature isn’t supported on their phones.
You can also shoot long exposures for creative effect or to keep ISO and noise levels low in images, although you will need a tripod for this. The compositional grids, such as the rule-of-thirds, golden ratio and the Virtual Horizon/level, are also great for assisting with composition and ensuring the camera is level during shooting. Here's how to get started and unlock the full power of the Lightroom app with a Creative Cloud subscription...
1. Set your file format
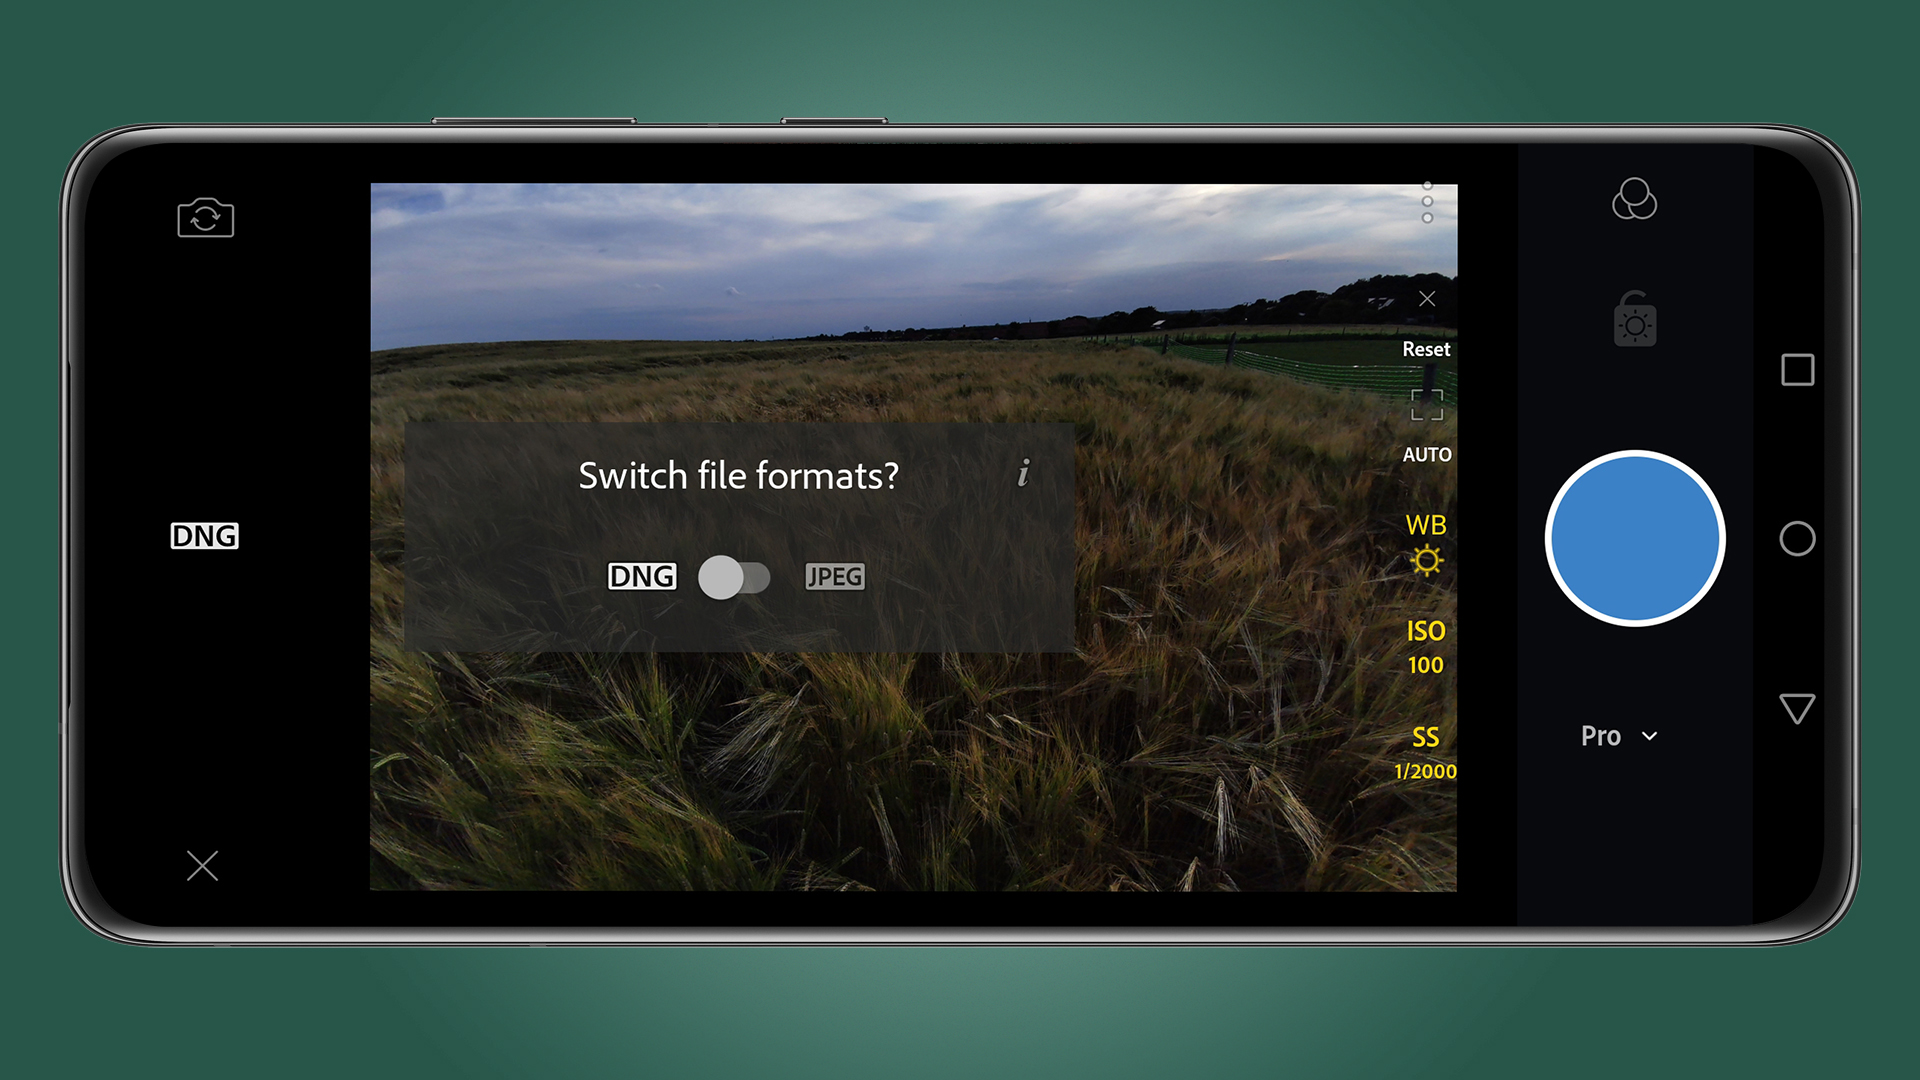
Click on the camera icon in the Library section of the app, which is where it opens by default, to open the camera section of the app.
Depending on the orientation of your iOS or Android phone, the file format selected will either be at the top of the screen or the left. Click on this and select 'DNG' so that you can enjoy the benefits of shooting raw (requires a Creative Cloud subscription).
2. Turn on guides
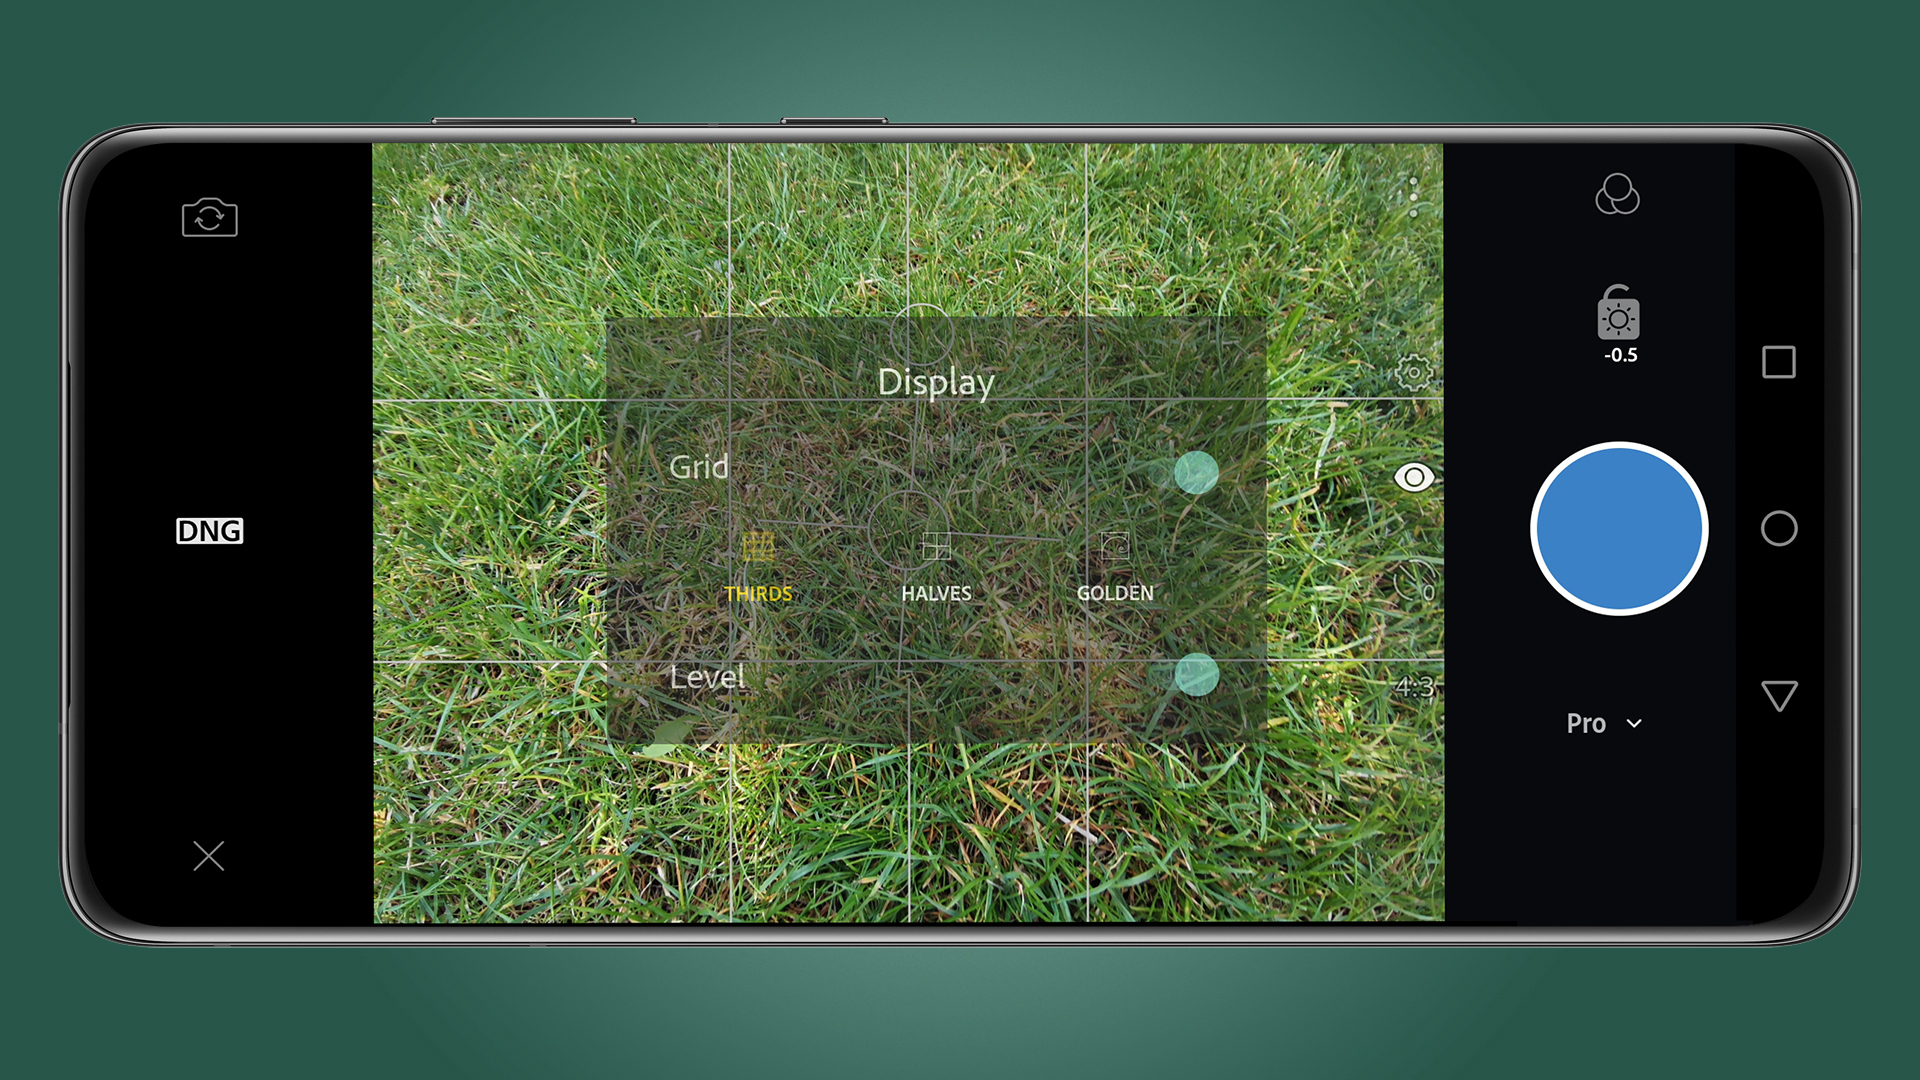
Below the shutter button, make sure that the dropdown menu is set to 'Professional', then click on the three dots next to the camera settings and click on the eye icon (or on iOS, a grid icon) which will take you to a section where you can apply different compositional grids and a Level. You can also set image ratio, self-timer and access other camera settings in this area.
3. Shoot in Professional mode
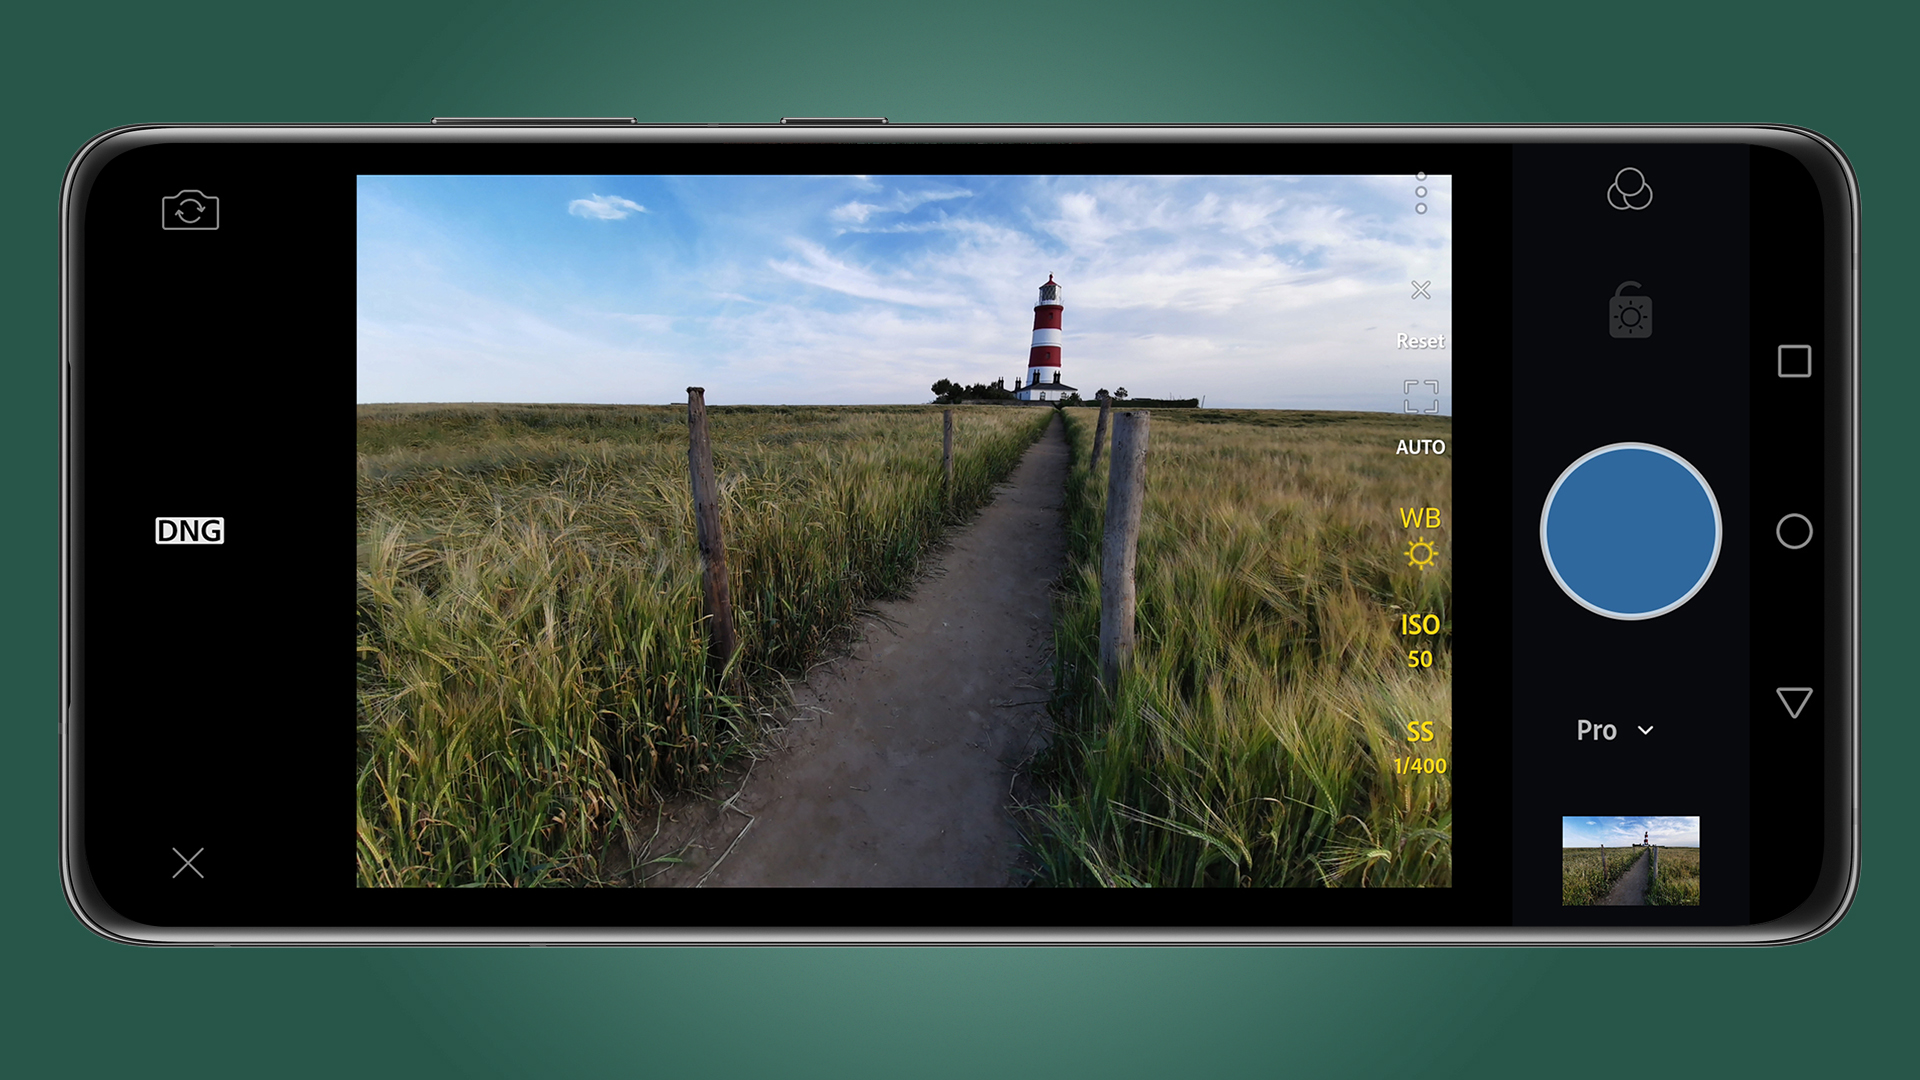
Click on the various settings along the edge of the Live View screen to adjust ISO, white balance and shutter speed.
To obtain a correct exposure, it’s your shutter speed that will need to be adjusted, so just make sure that for handholding it’s at 1/60 sec or faster. If not, increase ISO, but always shoot with the lowest setting you can get away with. Naturally, you'll be pressing the blue shutter button to shoot.
- These are the best Lightroom alternatives right now
How to edit photos in the Lightroom app
Editing in the Lightroom app is incredibly intuitive if you already use the desktop versions of Lightroom. But even for beginners, the control groupings at the bottom of the app screen take very little time to get used to, so you’ll learn exactly where the various controls are in no time.
As we mentioned previously, you’ll need a compatible Creative Cloud subscription to access all the tools and functionality in the app, so Adobe has incorporated a carrot here to try to entice users into taking subscriptions. For the smartphone app alone, it’s probably not worth the cost, but if you use the desktop versions of Lightroom and Photoshop already (or are planning to do so), you may as well take advantage of the excellent phone app, too.
In terms of editing, you can apply most of the adjustments possible in the desktop versions of Lightroom – it’s quite remarkable. These including cropping, exposure, shadows, highlights, white balance, lens corrections, distortion correction, localized adjustments and much more. In a nutshell, you have everything you need to process your images with the same level of control as Lightroom CC.
Here's how to do it, using our Lighthouse example at the start of this guide.
1. Turn on the histogram
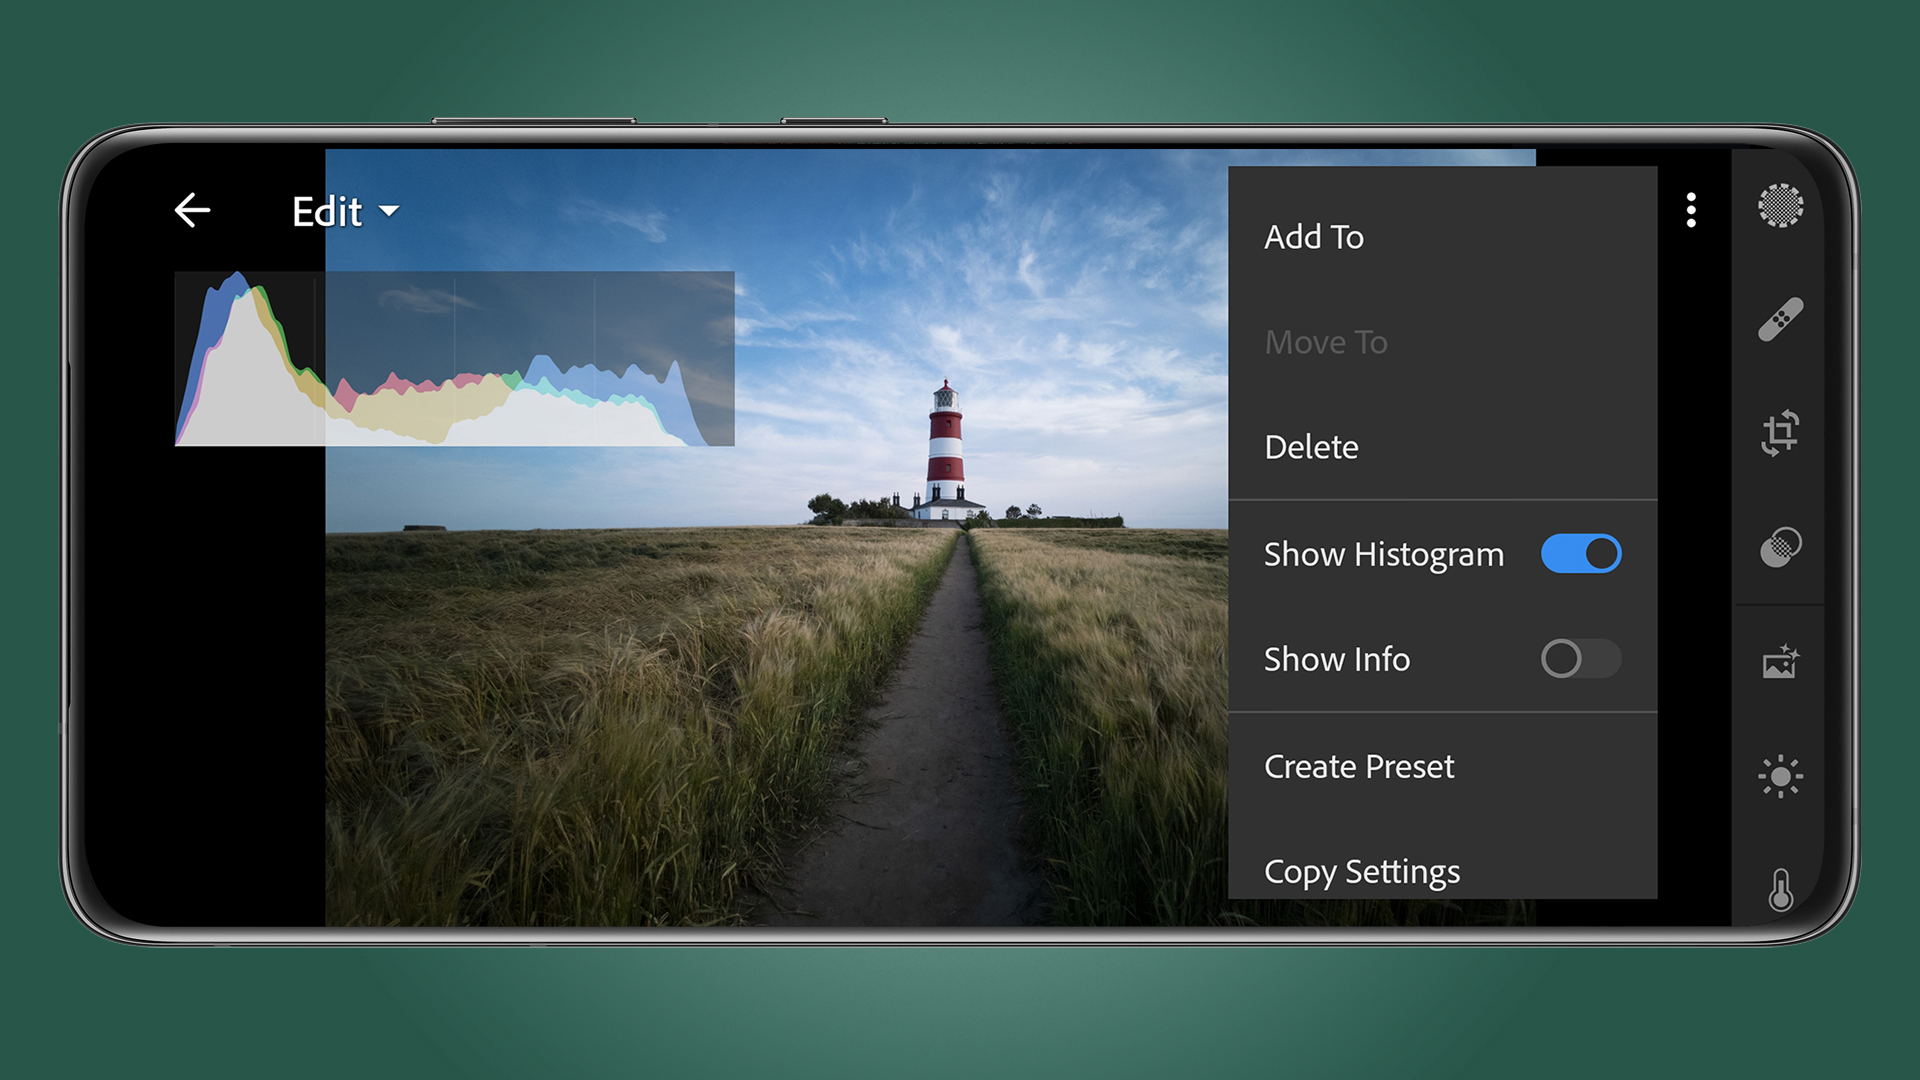
In the 'Library' section of the app, select the image you’d like to edit by clicking on it to open it into the edit section. Click on the three dots and make sure Show Histogram is turned on (on iOS, this is in the 'View Options' menu).
The histogram is a tool that helps shows clipping of shadows (on the left) or highlights (on the right). If the graph is touching either side, you know one of those things is happening in your image. While not all histograms need to show an even distribution of tones, it is the best tool for helping to avoid blown highlights.
2. Start with basic adjustments
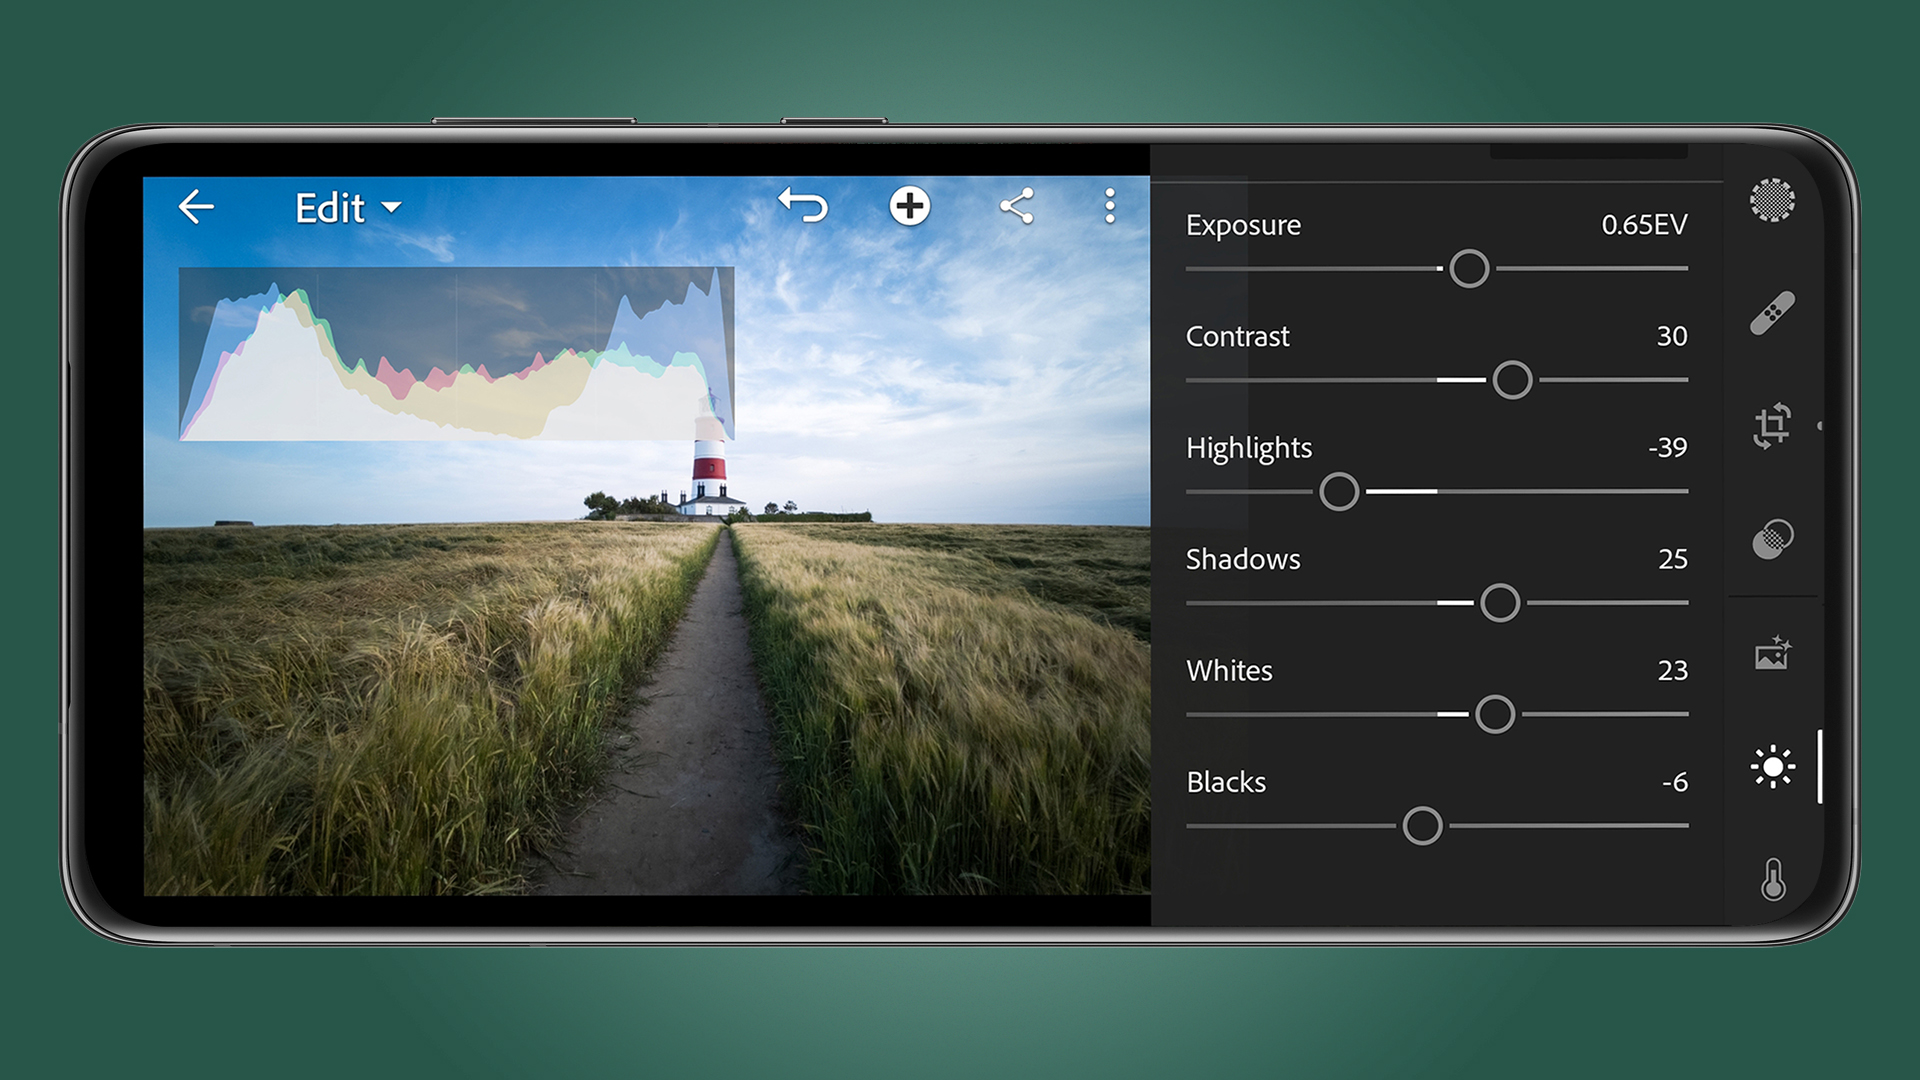
Along the bottom of the screen are 15 icons with a label. They’re fairly self-explanatory, but the most commonly used are Light (shown here), Color, Effects, Selective and Healing.
It makes sense to explore all these controls to familiarize yourself with where the different tools are. For this image, only the Light, Color, crop and Selective adjustments tools were required.
In the 'Light' section, we boosted the contrast, lifted the shadows and whites, and reduced the highlights to help bring out the foreground and add a little more drama to the sky.
3. Move to selective adjustments
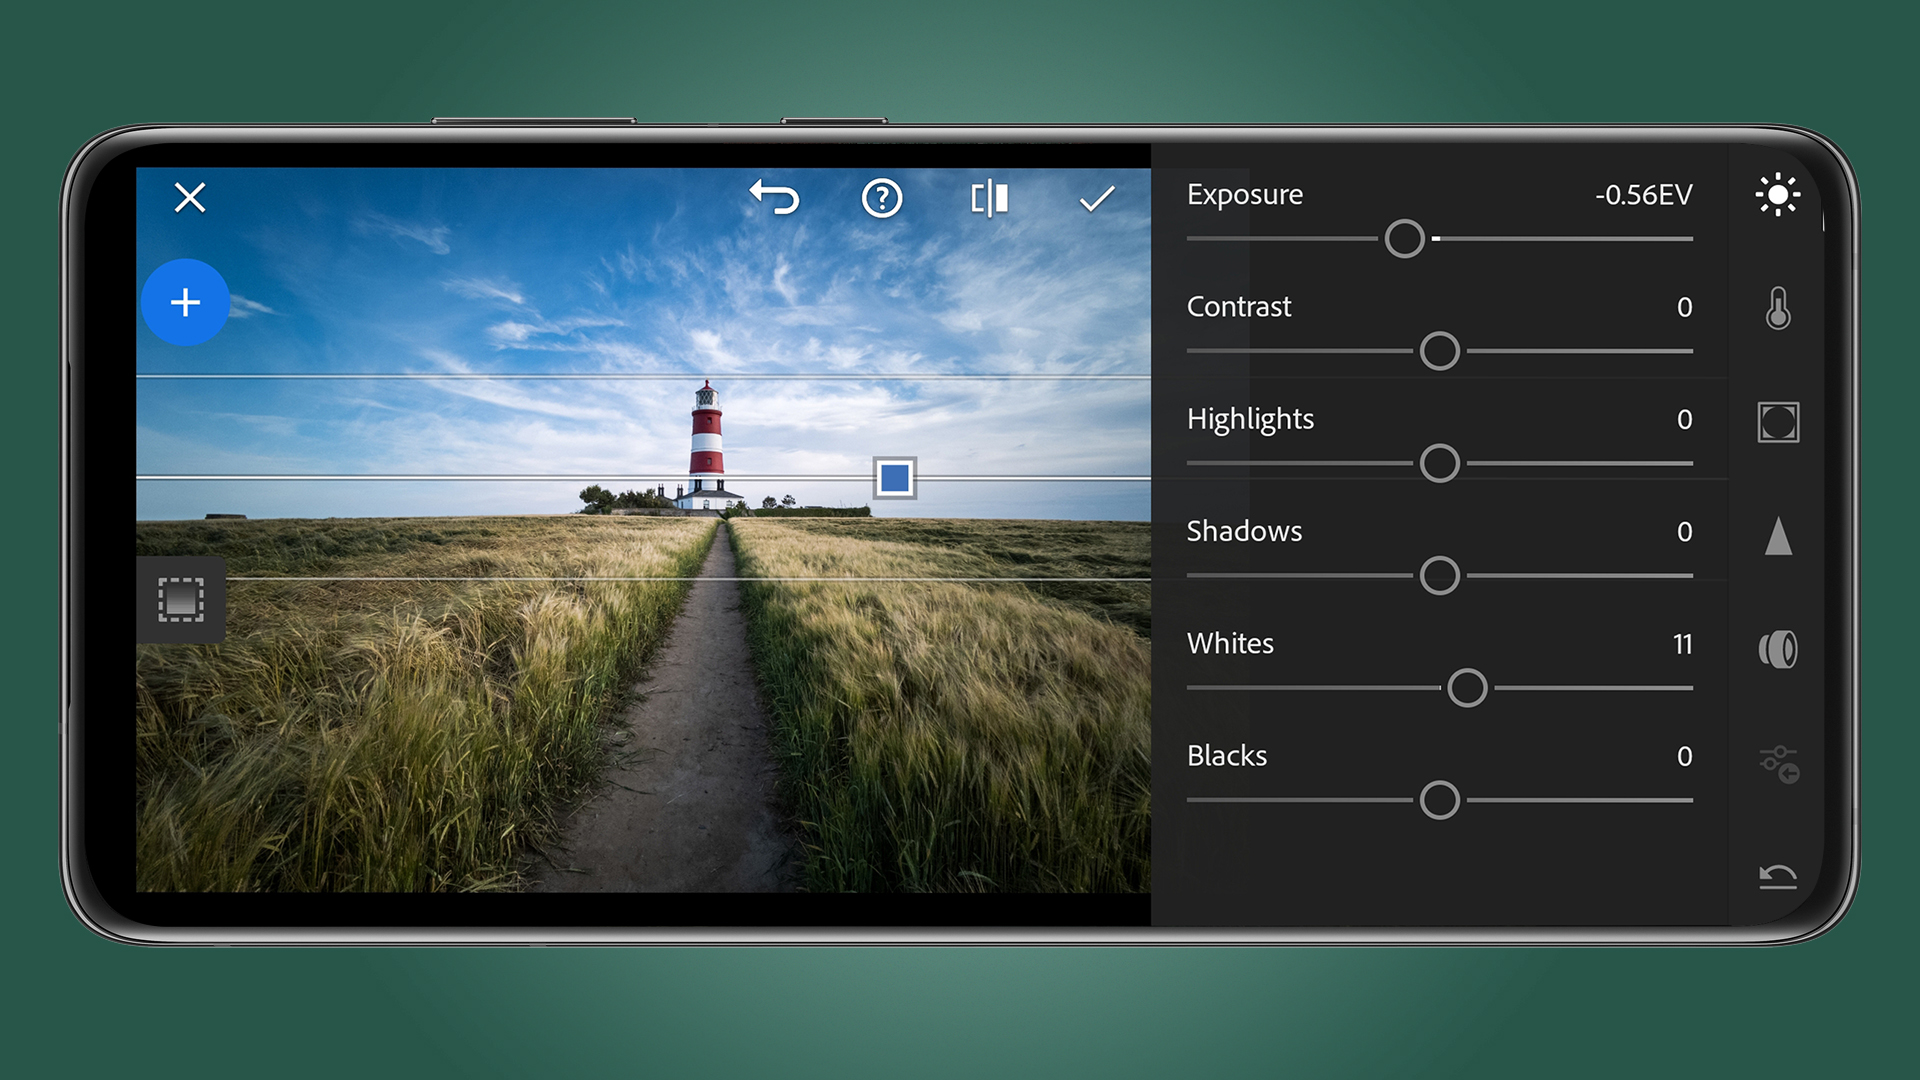
Click on the 'Selective' icon at the bottom of the screen and then on the '+' symbol which allows you to select the Adjustment Brush, Radial Filter or Graduated Filter.
Once you’ve clicked on the required tool, you can just click on the image and drag or paint over the area you want to adjust. One of the most useful tools for landscapes is the graduated filter, which lets you easily adjust the the exposure above or below the horizon.
In this image, we used it to slightly reduce the exposure in the sky to bring out more cloud detail and give it a deeper blue. Once you're finished, just click on the tick icon.
4. Crop & Straighten
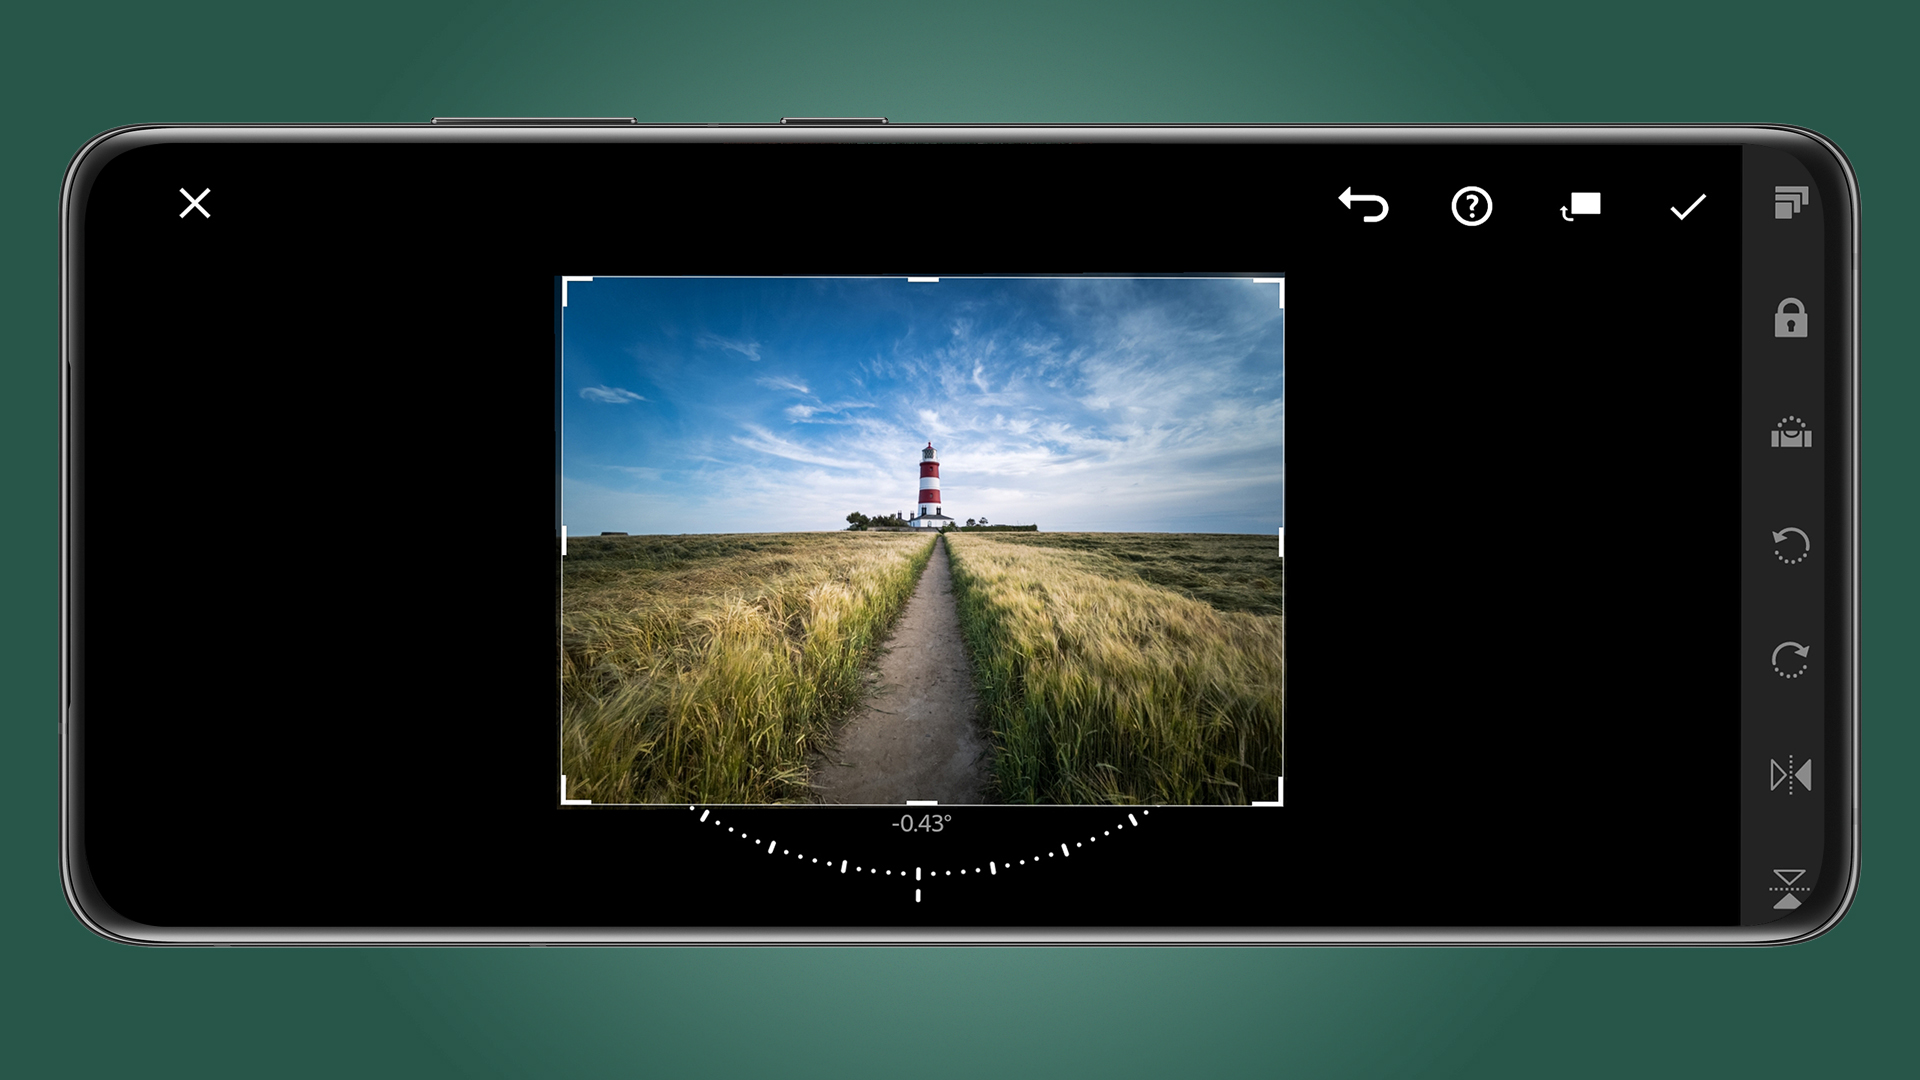
If you need to crop and straighten your image, click on the 'Crop' icon. At the bottom of the screen are clearly-labelled options for the crop ratio, plus options for locking your ratio, automatically straightening the image, rotating your image and flipping it.
The image above was straightened manually using the Crop Tool set to the original image ratio, while moving the angle control below the image.
5. Export
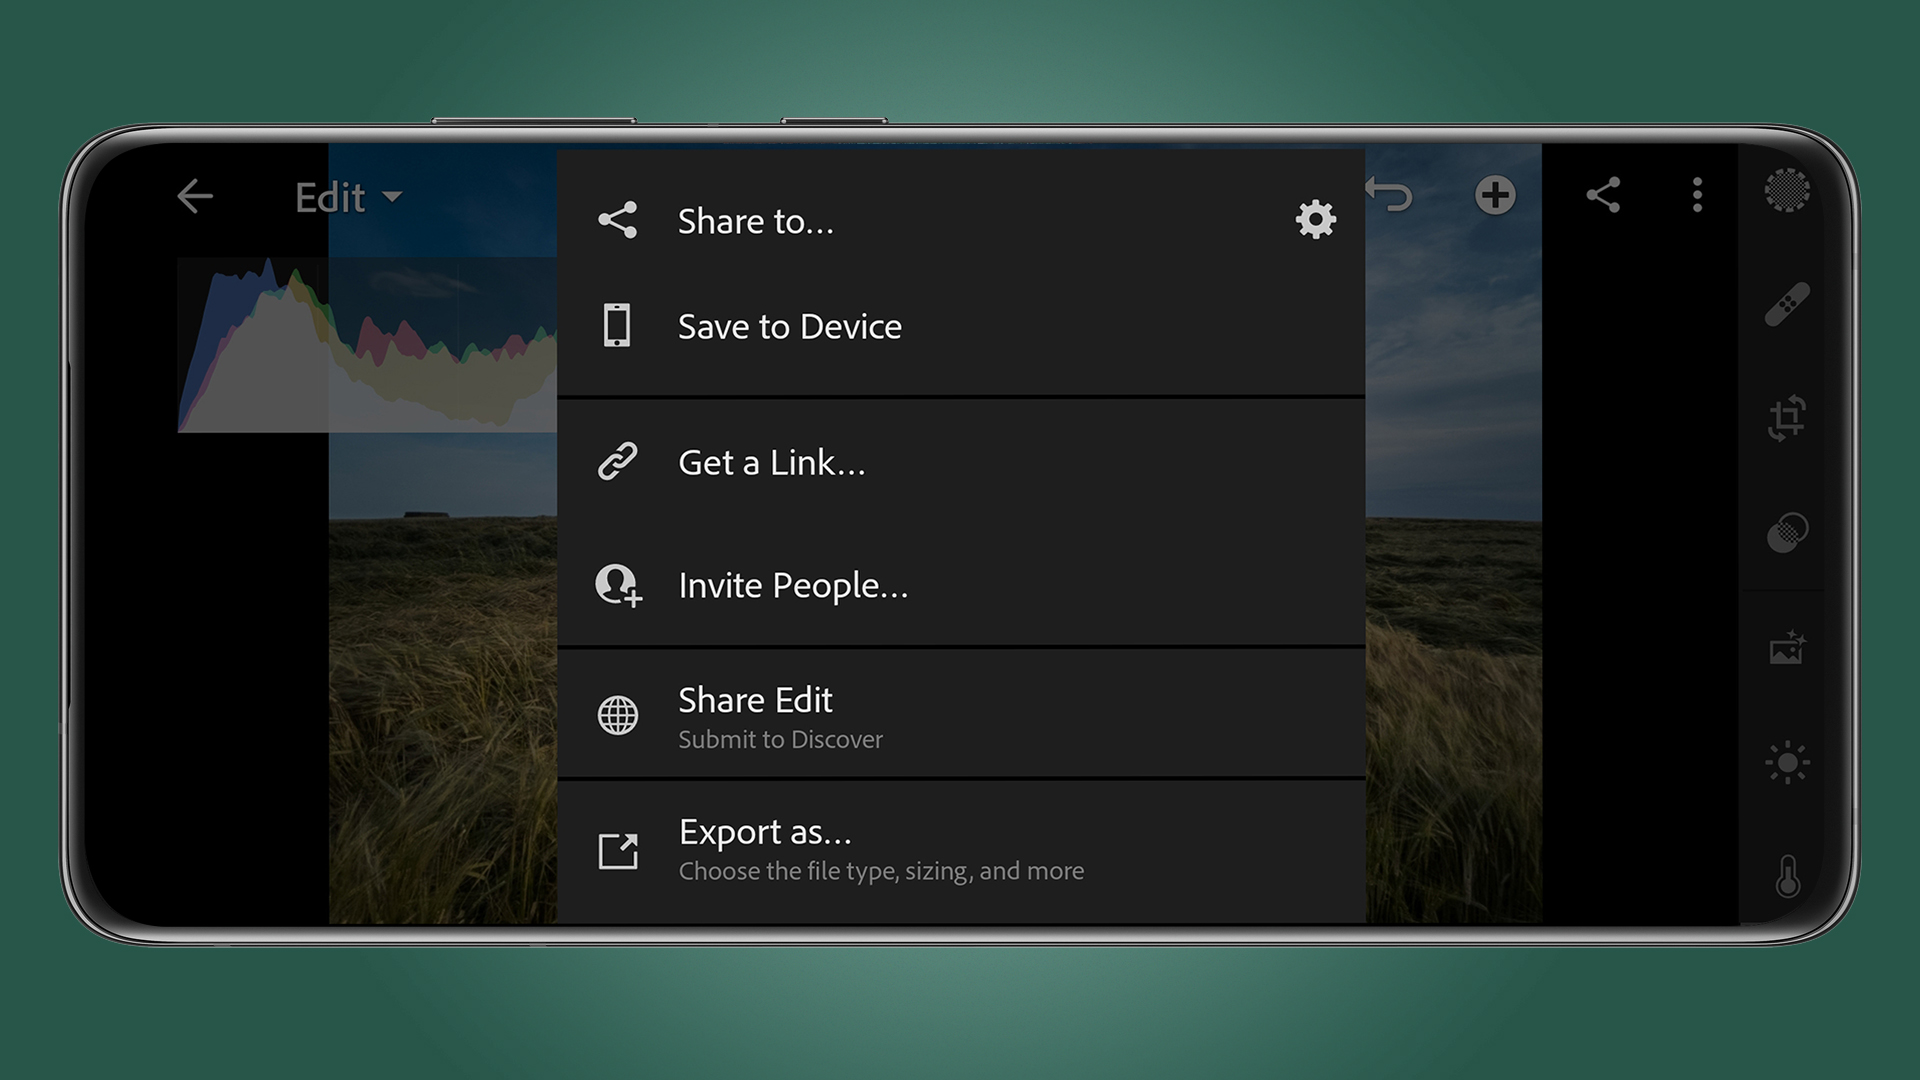
Once you’ve finished editing, the edited raw file will remain in the Lightroom app Library, although you will need to export images to share them.
To do this, click on the share icon and choose how to share the image from the list. 'Share to…' opens other app-sharing options, while 'Save to Device' puts it into your camera roll.
Lightroom app presets: how do I make my own?
The Lightroom app features both shooting and editing presets that help you achieve specific looks at the touch of a button. In both the camera and editing sections of the app, these are accessed by clicking on the icon made up of two overlapping circles.
The five shooting presets apply effects to images as you shoot them and these can be applied to both JPEGs and raw files. These are great if you like to see an effect on the screen as you shoot, and the effects can be reversed during editing if you wish, but there are many more presets available in the editing section of the app, so these are much better overall.
There are over 150 editing presets ranging from quick processing fixes to creative color effects, so it is possible to process your images entirely using presets rather than the manual controls. Plus, you can create your own presets or import those created by other users, so there’s a huge amount of scope for growing the collection of presets available. Let’s take a look at how to apply editing presets and how to save your own…
1. Select a preset
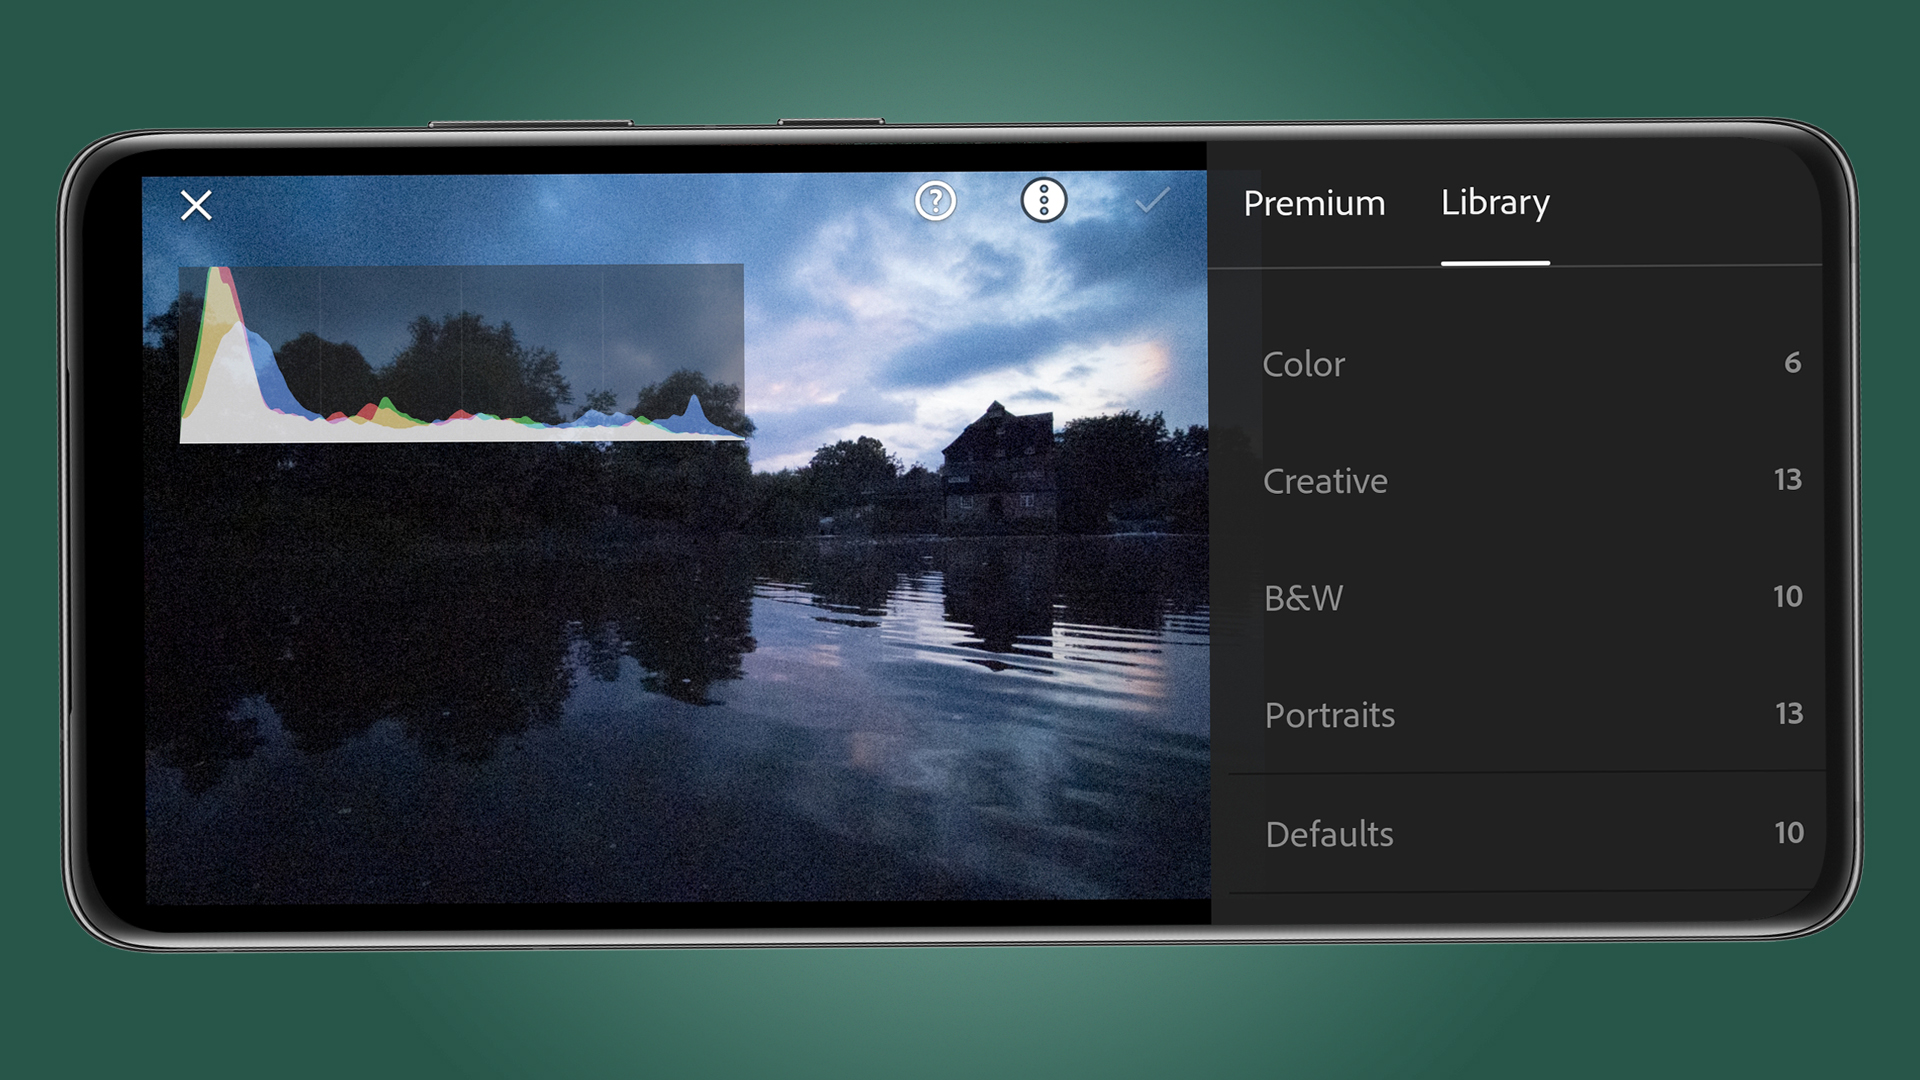
Make manual adjustments to your image if you wish, or you can simply dive straight into Presets by clicking on the Preset icon at the bottom of the screen.
Premium Presets are based around color effects, while the Library Presets are one-click edits for general and specific types of images. A combination of one or both sections can be used to process images without the need for manual adjustments.
2. Apply the preset
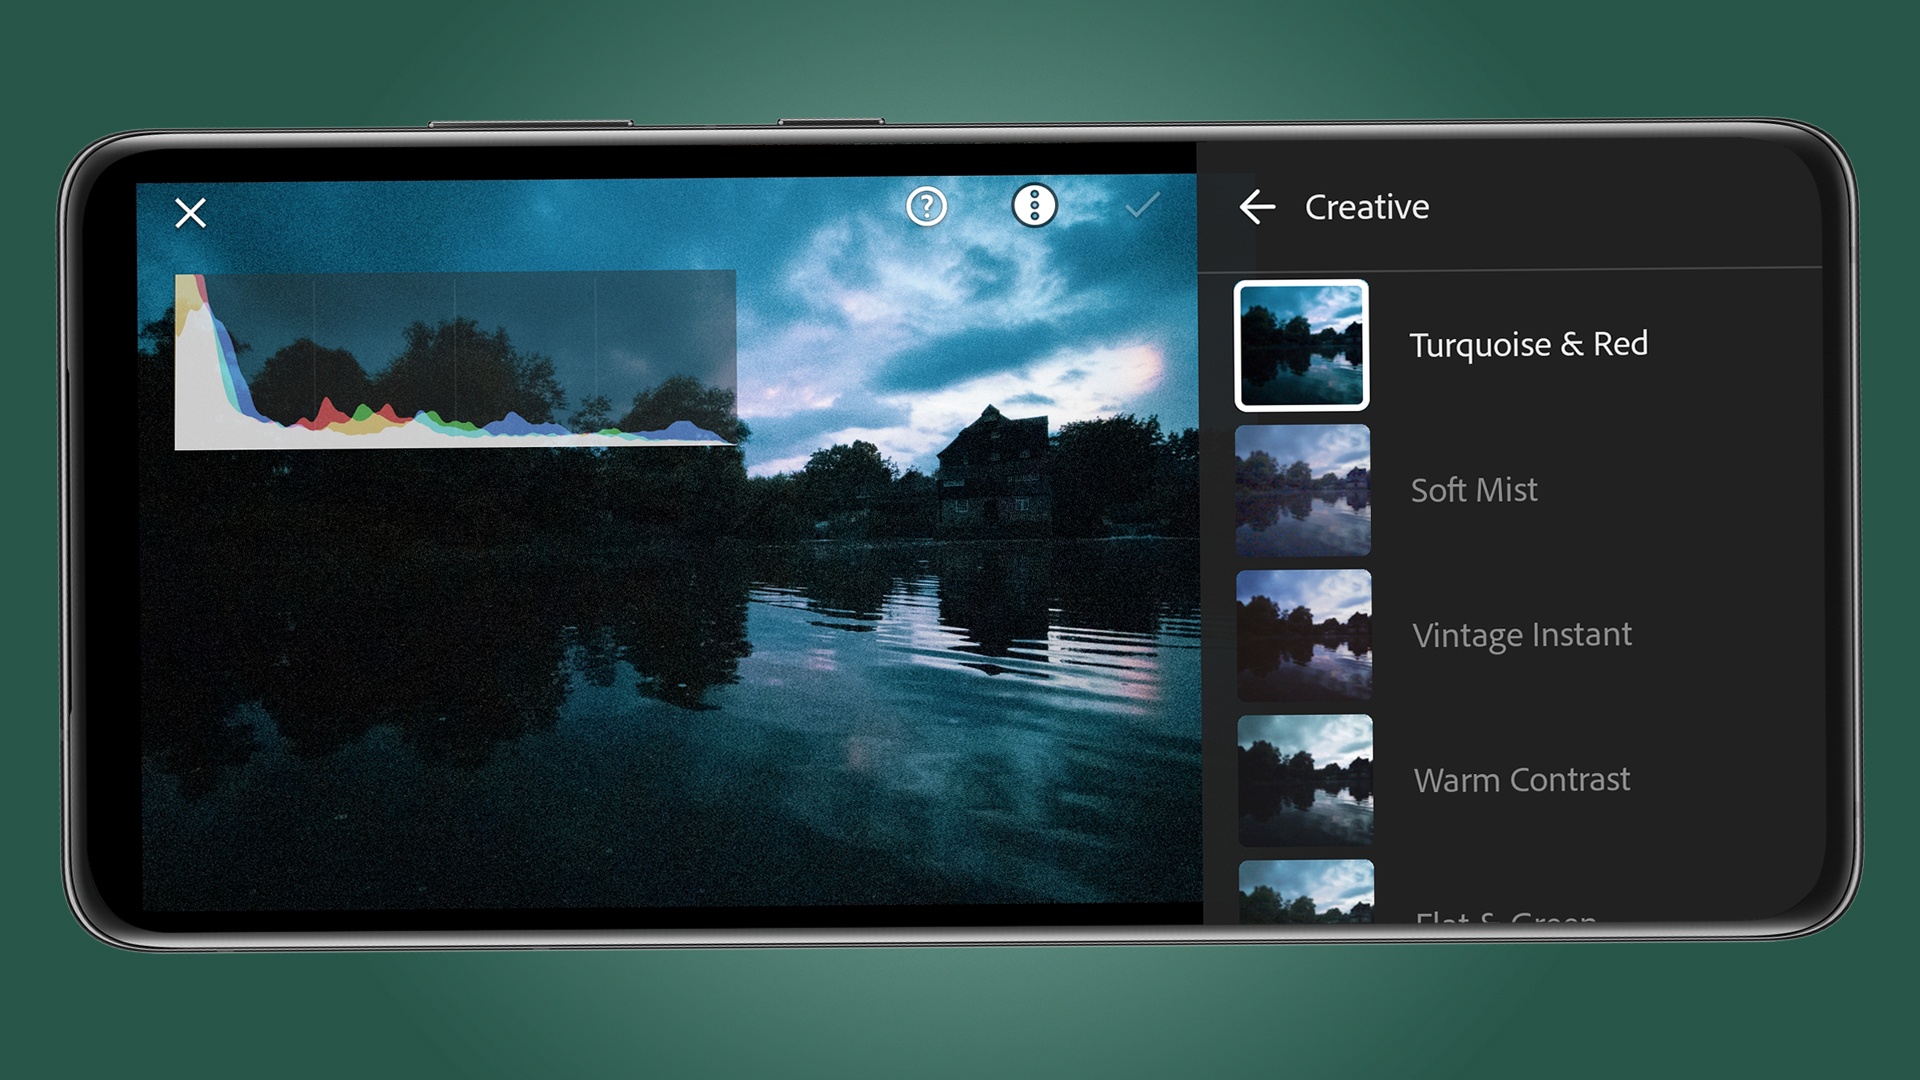
Presets show small thumbnails so you can see their effect before applying them, although this is of most use for color and black-and-white effects, because effects like sharpening are difficult to see at such a small size.
When a Preset has been selected you can click on the tick to move onto another Preset or onto another aspect of editing.
3. Create Presets
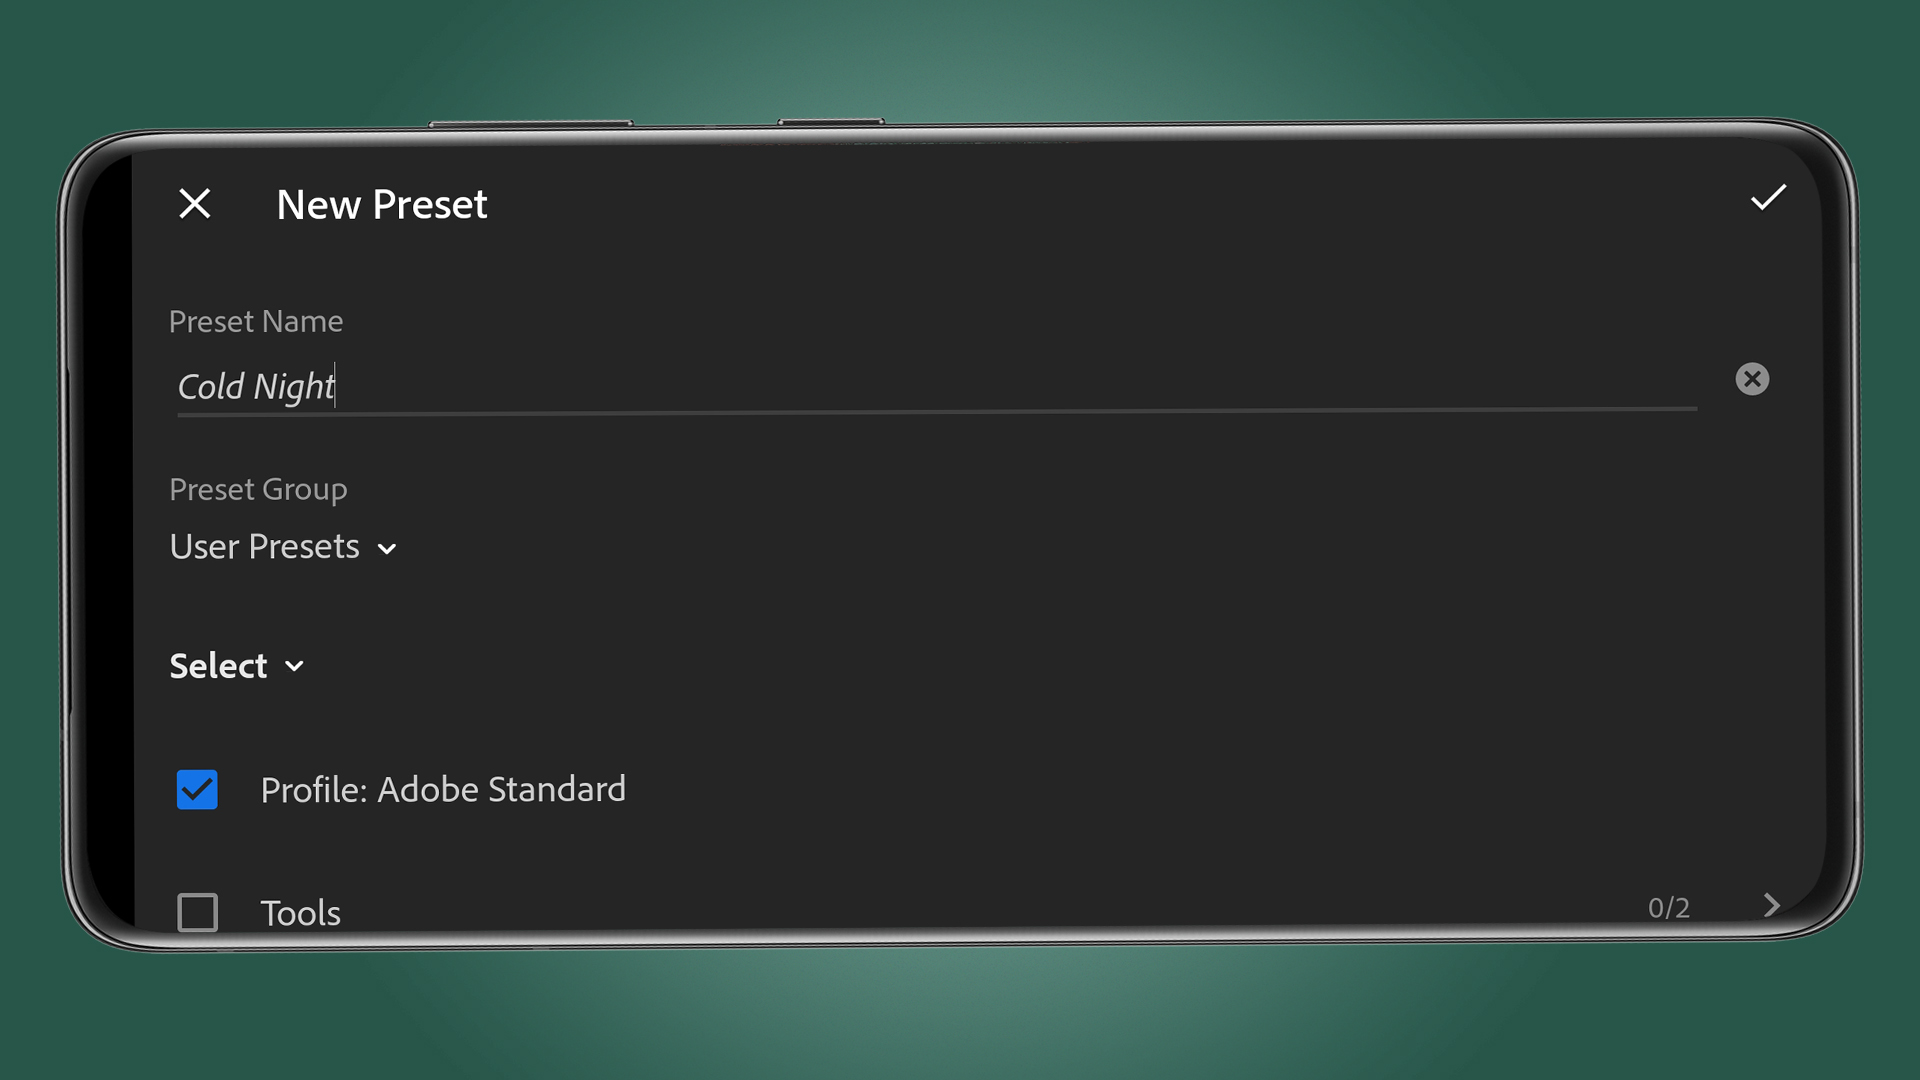
You can create your own Presets and decide whether these include Profile, Tools, Light, Color, Effects, Detail, Optics and Geometry adjustments or not.
To do this, edit your image manually then click on the three dots and select 'Create Preset'. Name the Preset and select the adjustment areas you would like to include before clicking on the tick to close the dialogue.
- These are the best photo editors you can download right now
from TechRadar: Photography & video capture news https://ift.tt/3ADikVs
via IFTTT


0 kommenttia:
Lähetä kommentti